
Learner Zone
Information to help you pass your test
Helpful Links
www.drivingtheorytest.org
Practice before you take the Theory Test
Book your test online
Use this link to book your tests on the direct gov website - gives you all the information needed!
The DSA Website
Plenty of information to be found here at the Driving Standards Agency- also a link to book your tests .
See also our LEARNER ZONE below Tips and Tricks and Videos
Book a theory test
Before you get behind the wheel you'll need to be 17 and have a valid provisional licence.
To get your provisional licence you can apply online, or complete a D1 form from the post office and send it to the DVLA (DVLNI in Northern Ireland) with your proof of identity and a passport-sized photo.
More Info
About the theory test
Before you can apply for your practical test you need to pass the theory test, which is made up of two parts: multiple-choice questions and a hazard perception section.
Test costs
The theory test currently costs £23 - this covers both parts of the test.
Booking your test
You need a valid provisional driving licence to take your theory test. Once you've got that, you can book your theory and hazard perception tests online, or by phone on 0300 200 1122.
The Theory Test
The first part of your theory test is a multiple-choice section designed to test your understanding of the rules of the road, including signs, road markings and appropriate reactions to situations. You'll have 57 minutes to answer 50 questions, and need to correctly answer 43 or more to pass.
Questions are chosen at random from a bank of over 1,000 possibilities, and you will be given some questions in the form of a case study. During the test you'll have the option to skip questions and return to them later.
The hazard perception test
For this you'll watch a series of 14 one-minute video clips, each showing potential hazards involving road conditions, pedestrians or road users. You respond to each hazard by clicking the mouse button. There are 15 hazards to identify and you can score up to 5 points on each one, depending on how quickly you identify them. You need to score 44 out of 75 to pass.
Be prepared
For both sections of the test you'll need to study The Highway Code. Or you can order our learn to drive books and CDs, or practise on our iPhone apps.
Practical Test
In your practical test you'll have about 40 minutes to demonstrate everything you've learned in your driving lessons. Before you start the practical test the examiner will ask you to read the number plate of a parked vehicle to check your eyesight, so remember to wear glasses or contact lenses if you need them.
You'll then be asked two vehicle safety check questions known as the 'show me, tell me' section. You'll get one fault if you give the wrong answer to one or both questions.
More Info
During your test
The practical driving test is designed to show that you can drive competently and safely in a variety of situations. You'll be asked to do two of the three reversing manoeuvres you've practised with your instructor, and possibly make an emergency stop.
In a 10 minute independent driving section you'll be expected to show that you can make safe decisions without prompting. Don't worry if you get lost, it's not a test of your navigation skills!
More about the practical test.
To pass your practical test you need to complete the test with no serious or dangerous faults and with 15 or fewer minor errors.
Test costs
A weekday practical test costs £62. Evening, weekend and bank holiday tests cost £75.
Don't forget to budget for a final lesson if you want one, and the cost of booking the instructor and car for the duration of the test.
Once you've passed
After you've passed your test you're ready to drive alone, but as a new driver you'll benefit from more experience. The Pass Plus scheme will give you more confidence in areas that may not have been covered during lessons. It consists of six modules, including motorway driving, driving in town and at night. And remember that completing the Pass Plus course successfully means you'll be able to claim a discount on your car insurance.
If you would like to discuss PASS PLUS or any other additional driving top ups
CALL LANCE 07721 011931
Vehicle Safety
You will be asked a series of questions about the vehicle
More Info
Vehicle Safety Check Questions
Q1. Open the bonnet, identify where you would check the engine coolant level and tell me how you would check the engine has the correct level.
A. Identify the coolant tank and check the min/max markings. If the coolant is below the min mark then more coolant will need to be added. To do this, unscrew the cap and pour in coolant until the max mark is reached.
Q2. Open the bonnet, identify where the brake fluid reservoir is and tell me how you would check that you have a safe level of hydraulic brake fluid.
A. Identify the brake fluid reservoir and check the fluid level against the min/max levels.
Q3. Show me/explain how you would check that the power assisted steering is working before starting a journey.
A. If the steering becomes heavy the steering may be faulty. Before starting a journey two simple checks can be made.
1) Gentle pressure on the steering wheel, maintained whilst the engine is started, should result in slight but noticeable movement as the system begins to operate.
2) Turning the steering wheel after just moving off will give an immediate indication that the power assisted steering is functioning correctly.
Q4. Open the bonnet, identify where you would check the engine oil level and tell me how you would check that the engine has enough oil.
A. Identify the dipstick, pull it out and check the oil level against the min/max markings.
Q5. Open the bonnet, identify where the Windscreen Washer reservoir is and tell me how you check the level?
A. Identify reservoir, lift off cap and make a visual check of level as there are no external markings on reservoir.
Q6. Show me how you would check that the horn is working (off road only).
A. Press the horn and listen (turn on ignition if necessary).
Q7. Show me how you would check that the brake lights are working on this car. (I can assist you, if you need to switch the ignition on, please don't start the engine).
A.Operate brake pedal, make use of reflections in windows, garage doors, etc, or ask someone to help. (may need to switch ignition on, prompt not to start engine)
Q8. Tell me how you would check that the brakes are working before starting a journey.
A. As you move off check the brakes. They should not feel spongy and the car should not pull to one side.
Q9. Tell me how you would check that the headlights and tail lights are working.
A. Turn on lights (turn ignition if necessary), walk around car and check that the lights are on.
Q10. Show me how you would check that the direction indicators are working correctly.
A. Activate the indicators or hazard warning lights and walk around the car to see if all the indicators are working correctly.
Q11. Tell me where you would find the information for the recommended tyre pressures for this car and how tyre pressures should be checked.
A. Information will be found using the car manufacturer's manual. Check the tyre pressures by using a reliable pressure gauge when the tyres are cold. Don't forget the spare and remember to refit the valve caps.
Q12. Show me how you would check the parking brake for excessive wear.
A. Apply the parking brake. When it is fully applied it should secure itself.
Q13. Tell me how you make sure your head restraint is correctly adjusted so it provides the best protection in the event of a crash.
A. The head restraint should be adjusted so the rigid part of the head restraint is at least as high as the eye or top of the ears, and as close to the back of the head as is comfortable. N.B. Some restraints might not be adjustable.
Q14. Tell me how you would check the tyres to show that they have sufficient tread depth and that their general condition is safe to use on the road.
A. A safe tyre will have no cuts or bulges. The tread depth should be at least 1.6mm across the central 3/4s of the breadth of the tyre and around the entire outer circumference.
Q15. Show me how you would clean the windscreen using the windscreen washer and wipers.
A. Operate control to wash and wipe windscreen (turn ignition on if necessary.
Q16. Show me how you would set the demister controls to clear all the windows effectively, this should include both front and rear screens.
A. Set all relevant controls including; fan, temperature, air direction / source and heated screen to clear windscreen and windows. Engine does not have to be started for this demonstration.
Q17. Tell me how you would know if there was a problem with your anti lock braking system.
A. Warning light should illuminate if there is a fault with the anti lock braking system.
Q18. Show me how you switch your headlight from dipped to main beam and explain how you would know the main beam is on whilst inside the car.
A. Operate switch (with ignition or engine on if necessary), check with main beam warning light.
Q19. Show me how you would switch on the rear fog light(s) and explain when you would use it/them. (No need to exit vehicle).
A. Operate switch (turn on dipped headlights and ignition if necessary). Check warning light is on. Explain use.
Overview
Top Tips:LANCE'S TOP TIPS TO PASS THE MANOEUVRES
All tips are written by LANCE only as a guide - please ask your expert LANCE SOM instructor for more advice.
New Driving Test Requirements
The driving test now has changes and includes Sat Nav testing lasting 20 mins.
You will be required to do several manoeuvres in your driving test and will be accessed on control and observation
New Manoeuvres - Parallel Parking, Driving into a Parking Bay, Pulling up - reversing and continuing.
Turn in the Road
Instead of doing a turn in the road (three point turn) or reversing around a corner you will be now asked to complete one of two new manoeuvres or parallel parking.
It is still worth studying these procedures and you may be asked to do them!
Aims and Objectives
To turn the car around in the road and face the opposite direction (say in a cul de sac)
Control
Complete the manoeuvre with as few moves as possible (3 on most roads, 5 may be acceptable)
Try nor to touch the kerbs!
Observation
Check around 360 degrees before each move, be aware and giveway to other road users throughout.
Method
Use our BITE-OBSERVATION-MOVEMENT technique (B-O-M) for each step SLOW CAR - FAST WHEEL.
STEP 1. (!st forwards move)
Find the bite and consider the camber (slope in the middle of the road), try not to roll when the handbrake is released. Check 360 degrees and giveway if necessary.
Use clutch control and steer briskly RIGHT (full lock)
About a metre from the kerb on the other side, steer briskly LEFT (as much as possible) before stopping 30 cm from the kerb. HANDBRAKE ON.
STEP 2. (reverse move)
Find the bite, complete observation and steer briskly LEFT looking over your left shoulder, about a metre from the kerb look RIGHT and steer RIGHT before stopping. HANDBRAKE ON.
STEP 3. (final move)
Find the bite, complete observation and steer briskly RIGHT , when clearing the kerb steer LEFT, check mirrors and drive on.
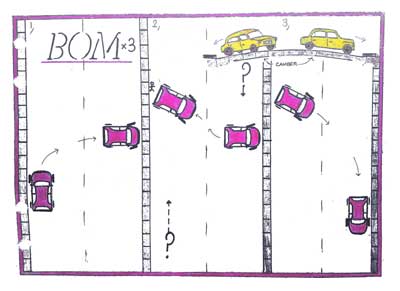
Your
Reversing Round a Corner
Aims and Objectives
Reverse from a major into a minor road (so you can go back in the opposite direction)
Control
Try to be about 30cm from the kerb (max 1m)
Try not to touch the kerbs!
Observation
Mainly looking over your left shoulder out of the rear windscreen with 360 degree checks whenever necessary - especially at the turning point.
Method
STEP 1. Drive past the side road
Use M-S-M, signal if necessary when passing the first half of the side road and pull up 30cm from the kerb, about 2 car lengths beyond the corner.
STEP 2. Reverse back to the turning point
Adjust the nearside door mirrors to sight the kerb. Select reverse gear (activating the white lights at the rear) then reverse slowly backwards using clutch control until you see the back of the car reaching the corner. Check 360 degrees.
STEP 3. Reversing around the corner point.
STEER LEFT, how much depends on how sharp the corner is. If you need to get a little closer to the kerb, steer left , to move away steer right.
STEP 4. Entering the minor road
When the front of the car is pointing straight, steer right to straighten the wheels. Continue to reverse back for a safe distance (about 2 car lengths). MSM and blindspot before driving on.
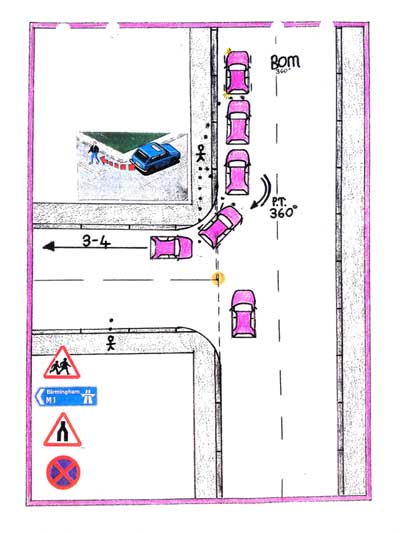
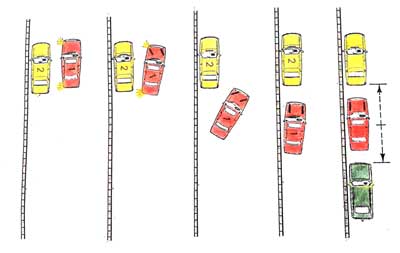
Reverse Parking
Aims and Objectives
To reverse behind a parked car and park close to the kerb (enabling you to park inbetween 2 cars in a town space).
Control
Complete the manoeuvre with a maximum of 30cm from the kerb and no more than 1 car length's distance from the car in front.
Observation
Mainly looking over your left shoulder out of the reer windscreen with 360 degree checks whenever necessary - especially at the turning point.
Method
STEP 1. Draw alongside the parked car.
Use M-S-M, and allow 30cm between the door mirrors. Pull up slightly ahead of the parked vehicle. Signal left if necessary and select reverse to activate the white reverse lights.
STEP 2. Reverse back to the turn point
This is when the backs of the cars are level Check 360 degrees.
STEP 3. Parking (1 LEFT - 2 RIGHT - 1 LEFT)
STEER l Turn LEFT, to reverse the back of the car towards the kerb.When the nose of the car is at 45 degrees, STEER l RIGHT. Then, drift in until the back of the car is about 30cm from the kerb (you can use the rearside door mirror to help). When close enough STEER FULL LOCK RIGHT - this will steer the back of the car away from the kerb while bringing the front parallel to it. STEER LEFT to straighten the wheels, you can pull forwards if necessary.
STEP 4. Angle start to move away
Clutch control, 2 checks on the blindspots
Bay Parking
Aims and Objectives
To enable you to reverse into a designated parking space in a supermarket or multi-storey car park.
Control
You need to complete parallel and inside the lines
Observation
Mainly over your left shoulder our of the rear windscreen with 360 degree checks throughout.
Method(BAY PARK to the RIGHT is most common at SOUTHPORT'S TEST CENTRE!)
STEP 1. The turning point.
Line yourself up with the middle of 2 bays before before the one you wish to park in. Check 360 degrees.
STEP 2. FULL LOCK RIGHT
STEP 3. Parking
When the nose of the car is straight STEER LEFT, to straighten the wheels.
Bay Parking to the left will be the same technique but STEER LEFT AT THE TURN POINT.
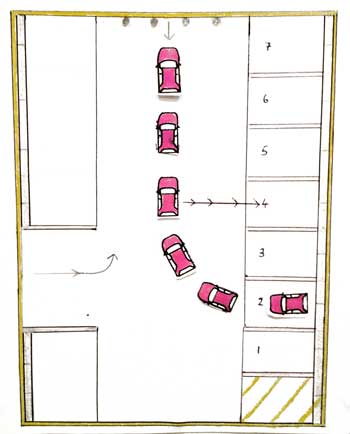
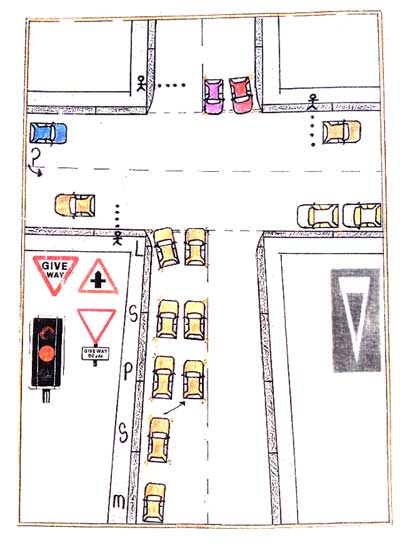
DEALING WITH CROSSROADS
Aims and Objectives To safely deal with junctions and observe RIGHT-OF-WAY
M-S-P-S-L
Control
When approaching junctions use the mirror-signal-manoeuvre routine, breaking the manoeuvre down into position-speed-look.
Observation
Always check the interior mirror and at least the appropriate door mirror before changing speed or direction. Note if turning left, the appropriate door mirror would be left and therefore it would be the right door mirrors for right.
Method
STEP 1. The APPROACH
In the interior mirrors note how close the traffic is following behind you. If they are too close, you should slow down sooner (taking a more gentle approach) and activating the red brake lights. If you're intending to turn left you might be looking for cyclists, motorbikes etc. If turning right, look for anything overtaking.
Make sure you let other road users know which way you are going and remember the brake lights. Generally, if you are going left or ahead keep to the left. If you're turning right move just left of the centre line (normal right turn position) or into the right hand lane. It is generally the same at roundabouts.
STEP 2. SELECT GEARS
GEAR SELECTION depends on whether or not the junction has an OPEN or CLOSED (restricted) view into the major road.
Most busy junctions are closed (in Southport) so only first gear will provide you with enough time to take effective observation and emerge safely.
If you have a very open view and you're sure it's safe, it may be possible to emerge in second or higher gears. Note your gear of choice should guide your speed.
STEP 3. OBSERVATION
Look to the right first because that's where the immediate danger might be coming from.Look right-left-right at least once before you emerge. Keep repeating this cycle if the road is busy.
STEP 4. MOVE
Edge out until you can see, using clutch control (creep and peep.) Emerge when it's 100% safe and check your mirrors on the new road.
IMPORTANT
If turning left and the vehicle opposite is turning to their right (the same direction as me) who has priority? You have priority.
If going ahead and the vehicle opposite is turning to their right who has priority? You have priority.
Therefore, when you are turning right you generally give the other vehicle priority if they are going to their left or straight ahead.
If turning right and the vehicle opposite is also turning right what should I do? It's equal priority so make eye contact and expect that whoever is there first might expect to go first. If that's you, edge forward slightly and if it feels safe carefully continue.